


Hubley Tips

This page is a compilation of tips received from Hubley model builders. If you have a tip you'd like to share, please send an email to: HubleyTips @ mafca.com. We are looking for a moderator of this page - if you'd like to do that, please send an email to webmaster@mafca.com.
Until we have a volunteer moderator, your webmaster will handle the updates for this page.
Wheels and Screws
From Bob Ward
It is very important to make sure the inside surface of the wheel hubs are smooth so they turn freely against the brake drums. The outside of the brake drums are sanded smooth to remove any casting seams so the wheels will spin freely. Dry lubricants such as powdered graphite will help to make the wheels spin freely. This is important because some cars will run as if the brakes are dragging if that step is neglected.
When assembling the front end, insert the screws which hold the tie rod on from the bottom rather than from the top. This will allow the front wheels to be locked in a straight ahead position without having to remove the body. It may take some adjustment to get the wheels pointing straight. This is an option because some fast cars also have the tie rod ends loose so the wheels can turn left and right and follow the rails down the track. Whether the front wheels are locked straight ahead or able to turn easily is up to the individual racer.
If you have any questions you may contact Bob Ward Jr., 909 924-6052
Hubley Screws
From Rick Black, Las Cruces NM - Posted May 2019
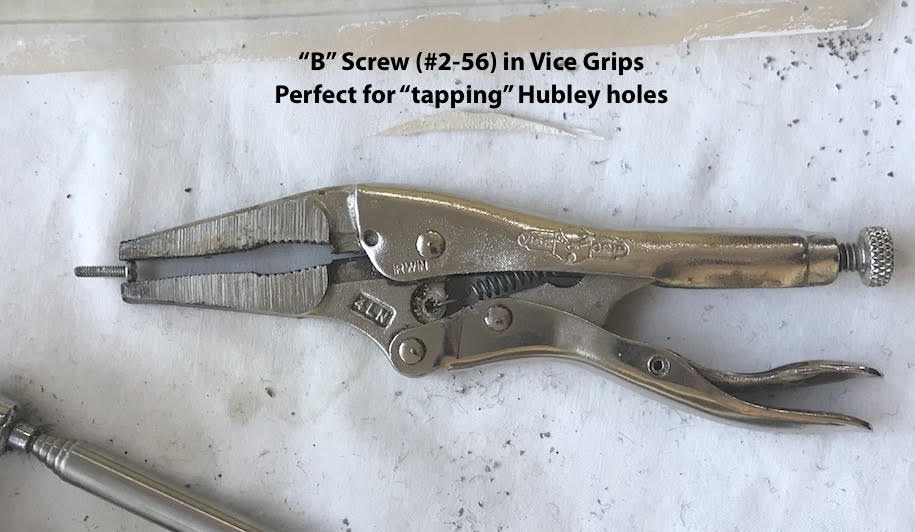
One of the things the Hubley instructions mentions is to “tap” the screw holes in the model before assembly.
Since the screw holes are so small (#2-56) and I didn’t have the appropriate tap, I used one of the “B” screws (the longer of the two) in a vice grip to “tap” the holes. And I rub the screw on a dry bar of soap first to “lubricate” the screw as I work it into the holes in the chassis and fender assembly. This setup works much better than trying to use a screwdriver. Give it a try.
If you have any questions or updates to this information, contact Rick.
From Rick Black, Las Cruces NM - Posted April 2019
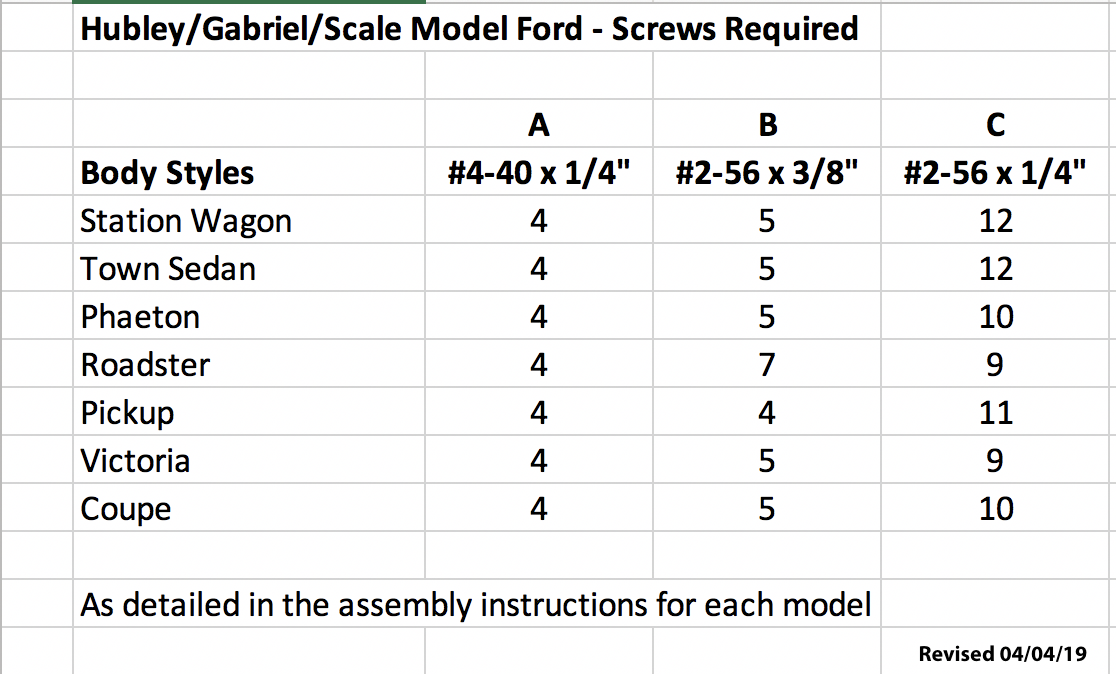
I recently purchased two partially completed Hubley models and discovered some of the screws were damaged and some were missing. From the good ones I found, I took the measurements (see chart at right.) Inspecting the original assembly instructions, I was able to count how many of each were required in each kit.
Each of the 7 kits contain three types of screws. They are all labeled A, B, and C.
Screws labeled "A" are for the wheels to axles. They are #4-40 x 1/4".
There are 4 in each kit.
Screws labeled "B" and "C" are for body and chassis.
The "B" screws are #2-56 x 3/8" and are the long ones.
The "C" screws are #2-56 x 1/4" and are the shorter of the two.
The number of "B" and "C" vary by kit. There are always more of "C".
Hubley "Glass" Windshields
From Bob Perry, Glendale Oregon - Posted April 2019
If you have paint on plastic windshield or side windows, you can remove it with brake fluid. You can remove the scratches by starting off with 400 grit sandpaper and working your way up to 3000 grit. After you've done that, dip it in floor polish then let it dry. Important note: while it’s drying, cover the item with a bowl or glass (depending on how large it) is to keep dust bunnies from sticking to it. I do this all the time on my hot wheels and matchbox restorations - works great.
One other thing: if your plastic glass gets ruined, fret not! Just get a "blister pack" used to package so many items (like from a package of batteries) and make an outline of the old glass on the flat parts of the blister pack and cut it out. If you don't already have the windows, make a template out of a business card, make sure it fits, then use it to cut out from the blister pack (or any other thin piece of plastic.)
Fan Belt - posted 05/26/19
How about adding a fan belt to your Hubley motor? Go to your dollar store or drug store and look for tiny hair bands. If you can't find black ones, you can use a black magic marker to convert a colored one. One package will be enough for dozens of Hubley cars - share with your friends.
Hubley Casting Numbers
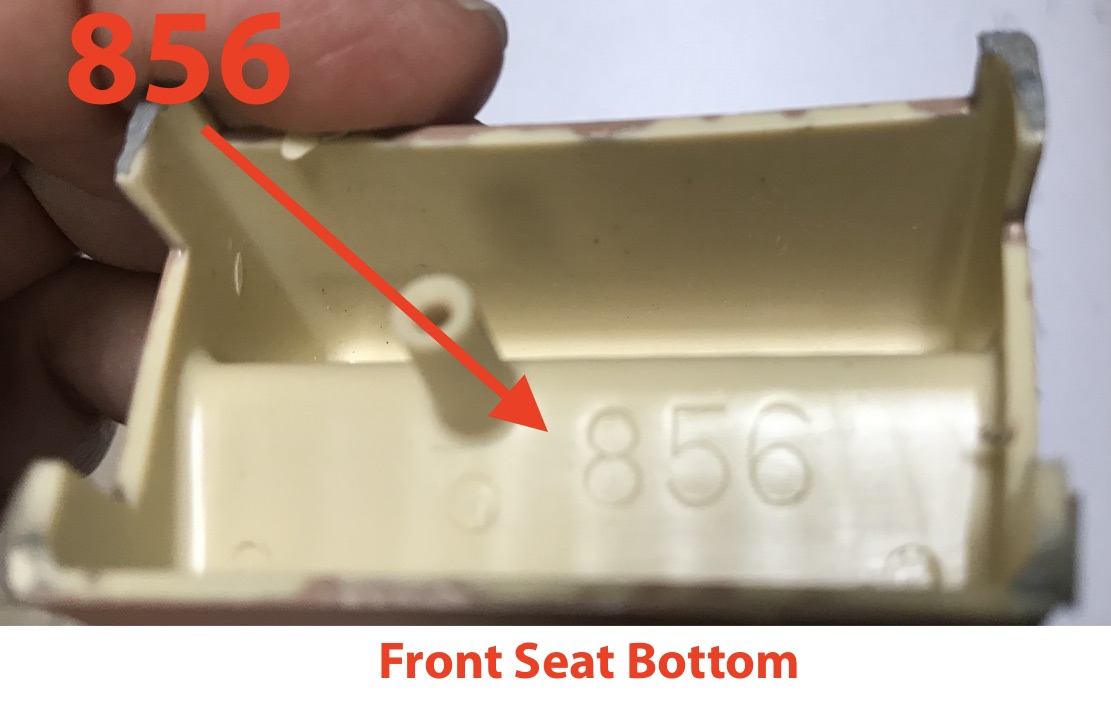
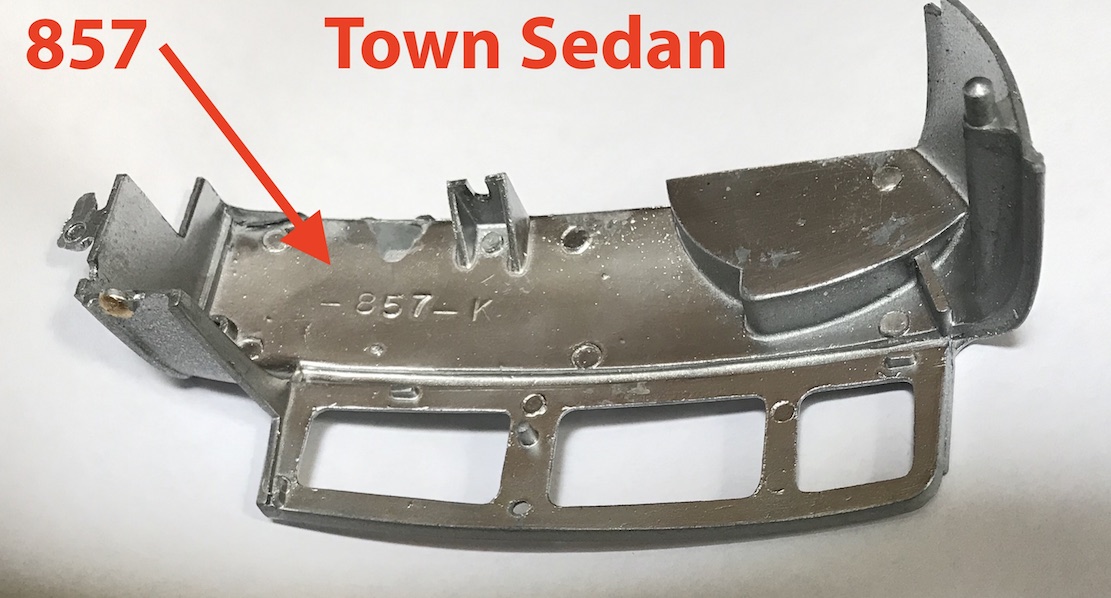
From Rick Black, Las Cruces NM
On many of the larger pieces in Hubley kits is a three-digit number which indicates the kit number. I haven't found any "official" list of these, but the following is my observation.
850 - Roadster
856 - Phaeton
857 - Town Sedan
866 - Victoria
??? - Coupe
??? - Station Wagon
posted 08/29/19
Hubley Video Tips:
Headlights - posted 05/26/19
The headlights are typically the most fragile part of Hubley cars. Here's how one person creates a new headlight bar and uses jewels for the lenses: To watch, click here:
Hubley Literature:
Several MAFCA members have donated copies of the instructions that came with each Hubley/Gabriel/Scale Model kit. Thanks to Frank Rosin. John Icenhower and RIck Black! If you have instructions that are better (or different) from ours, please contact the webmaster.
Back to Hubley Main Page
